Congratulations on your new Showit site—how does it feel to know you’ve picked the best website builder for creatives?!
(You can tell we’re just as excited as you are.)
Before you can *officially* launch your Showit website and start showing it off to the world, though, there are 7 things to check off your to-do list:
✓ Add and adjust your branding
✓ Write and integrate your website copy
✓ Input your media (images, videos, gifs, etc)
✓ Customize your website design
✓ LAUNCH—and market—your Showit website!
And we’re about to give you our best tips for all of those action items, so you can launch the best Showit website in the game.

Before you begin customizing your new website, let us remind you: you chose to use a Showit template so you DIDN’T have to design something from scratch.
Aka don’t make your own life harder by tweaking and adjusting and moving and redesigning before you even get your content in there.
If you have a TONIC template, you can be certain that we did everything in our power to give you a solid masterpiece to start from, so there’s no need to reinvent the wheel and make an already-almost-finished design back to square one by messing around with it before you even input your content.
To be clear: this isn’t us saying “don’t customize your site” because we WANT you to customize your site (we do have a Client Showcase we’re selfishly obsessed with updating…) – but what we DON’T want you to do is embark on a new career as a web designer at 3am only to wake up the next day and wish you could click a mass “undo” button to revert back to the original template design you purchased.
Add your content first, then customize. You’ll thank us later. 😉
#1 – Adding and Adjusting Your Branding
You’ll want to make sure you’ve gathered your:
- PNG files of your logo, and all of its variations
- Any and all pattern files used in your branding
- Any and all design elements / icons used in your branding
- Your favicon
- All of your brand font styles
- Your color palette hex codes
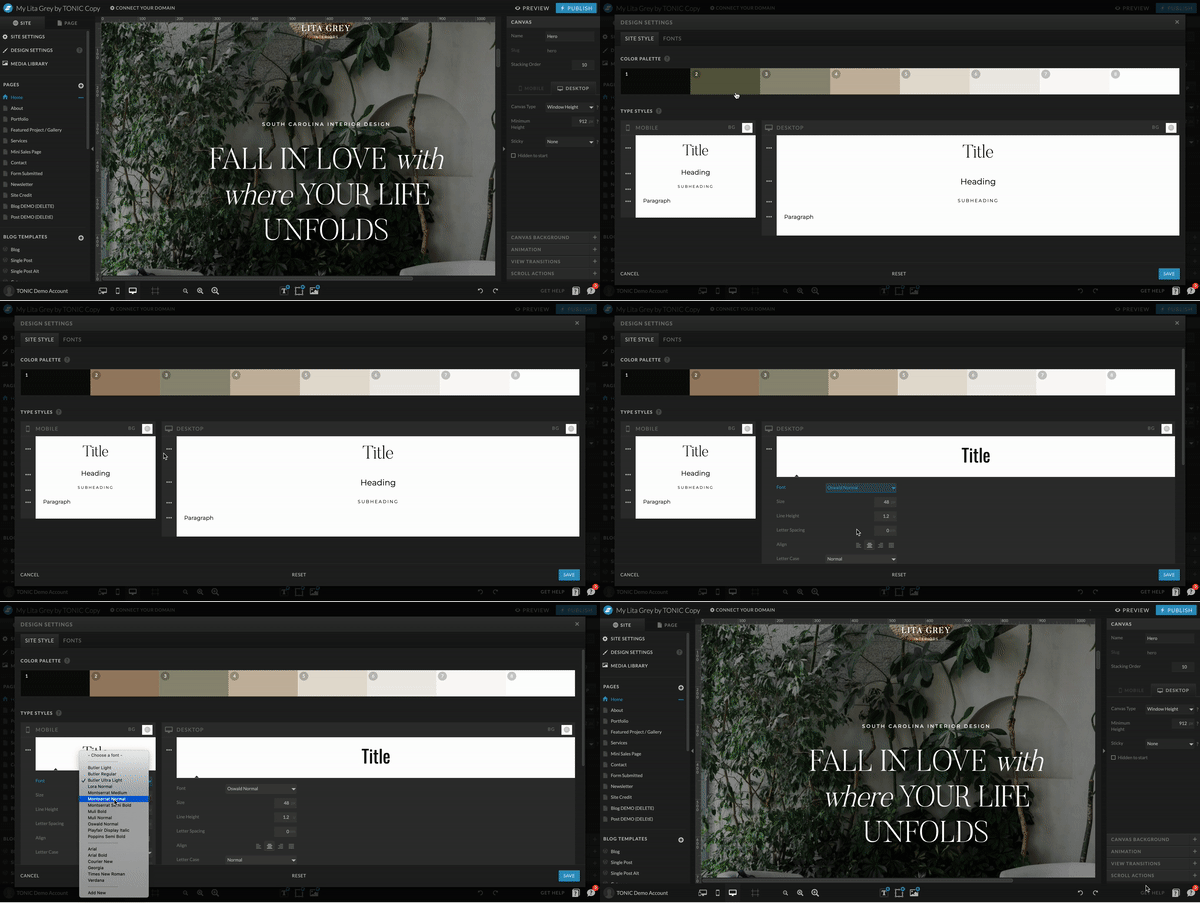
Once you’ve done that, you can update your global design settings panel! This will allow you to automatically change your fonts and colors across your entire site with just a few clicks.
Here’s how to add custom fonts, and here’s how to edit design settings for fonts and colors.
#2 – Writing and Integrating Your Website Copy
No website is complete without copy that captures your readers’ attention, then inspires them to make the leap from website stalker to paying client or customer.
Our number one piece of advice for adding copy to your website? Write it outside of Showit… preferably in a Google Doc with your template open alongside it.
How you organize your document is up to you, but we suggest copying the text that comes with your TONIC template, pasting it in the Google Doc, then writing your copy underneath it. When it comes time to paste your copy in, you’ll know exactly what goes where!
Pro Tip: feel free to use the copy that comes with your Showit template as cues for what to write about. It’s there for a reason! Keep it simple (seriously, less is more unless you’re telling a great story), make sure your reader could get the gist of the page if they ONLY read the largest pieces of the text on the page, and remember what you want them to take away from their experience!
We’ve outlined all of our TONIC tips for writing copy that people actually want to read right here, but we also think you’ll find these resources helpful (since they’re from copywriters we know and love):
→ Conversion Copywriting Strategies For Your Website
→ How To Plan And Write Your Website Content
→ 5 Things Every Website Needs To See Results
→ How To Write Effective Website Copy
→ How To Write Copy For Any Page Of Your Website
→ How To Make Writing About Yourself Suck Less
No matter what you do or sell, you’ll want to ensure your website answers these 5 questions for your readers:
- What do you do?
- How do you do it differently or better than anyone else?
- Can you do THAT for me?
- Why do your clients / customers choose you?
- What’s the clear next step? (aka where do I go from here once I’ve decided I want to keep reading or take action?)
Pro Tip: Remember, your copy isn’t for you, it’s for your audience. Put yourself in your potential customers shoes—what do they want to know? What are their problems/wants/needs? And how can you solve it for them?
And don’t forget: people don’t want to read generic, boring copy—they want to read stories. Here’s how to write better ones.
#3 – Inputting and Optimizing Your Media
Although you are more than welcome (and encouraged!) to use the stock photos that come with your TONIC template, you’ll want to add some of your own media to help make your website content feel more personal.
We recommend gathering all of your media (brand photos, stock photos, videos, logos, etc) before starting to implement them into your Showit template, whether it’s somewhere online like Google Drive or DropBox, so you can access them easily.
Then, once you’re ready to add them to your website, you can upload them to Showit’s media library, where you’re able to neatly organize them into folders.
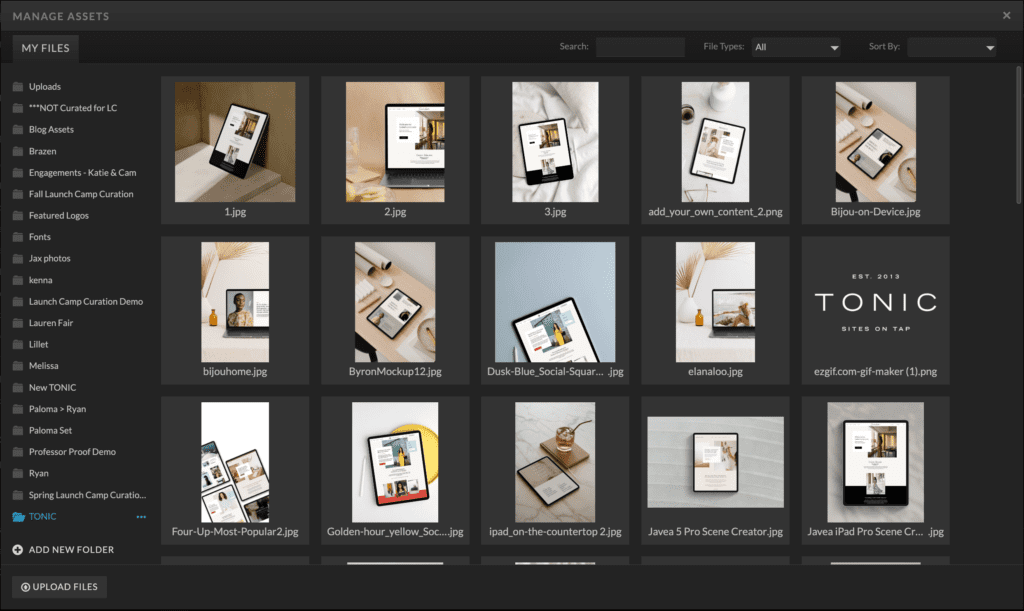
Being able to effortlessly categorize your media is one of the million things we love about Showit, because it makes your life SO much freaking easier when it comes time to customize and update your website.
Showit also does all the hard work of resizing your images to fit the area and screen dimensions for you, so you don’t have to worry about anything techy when adding your media, except optimizing your images.
Google—and your website viewers—hate slow websites, which is why we recommend making sure that your images are at least 1500px and no larger than 3500px, in order to avoid any potential page load speed issues.
(Our favorite tool for quickly optimizing each of your website images is tinyjpg.com, which allows you to upload and compress photos in batches of 20.)
Once all of your photos are uploaded and organized, you can start adding them to the various pages of your website by clicking on the image from the template you’d like to replace, selecting “Image” from the settings bar in the top right hand corner, and clicking “swap image.”
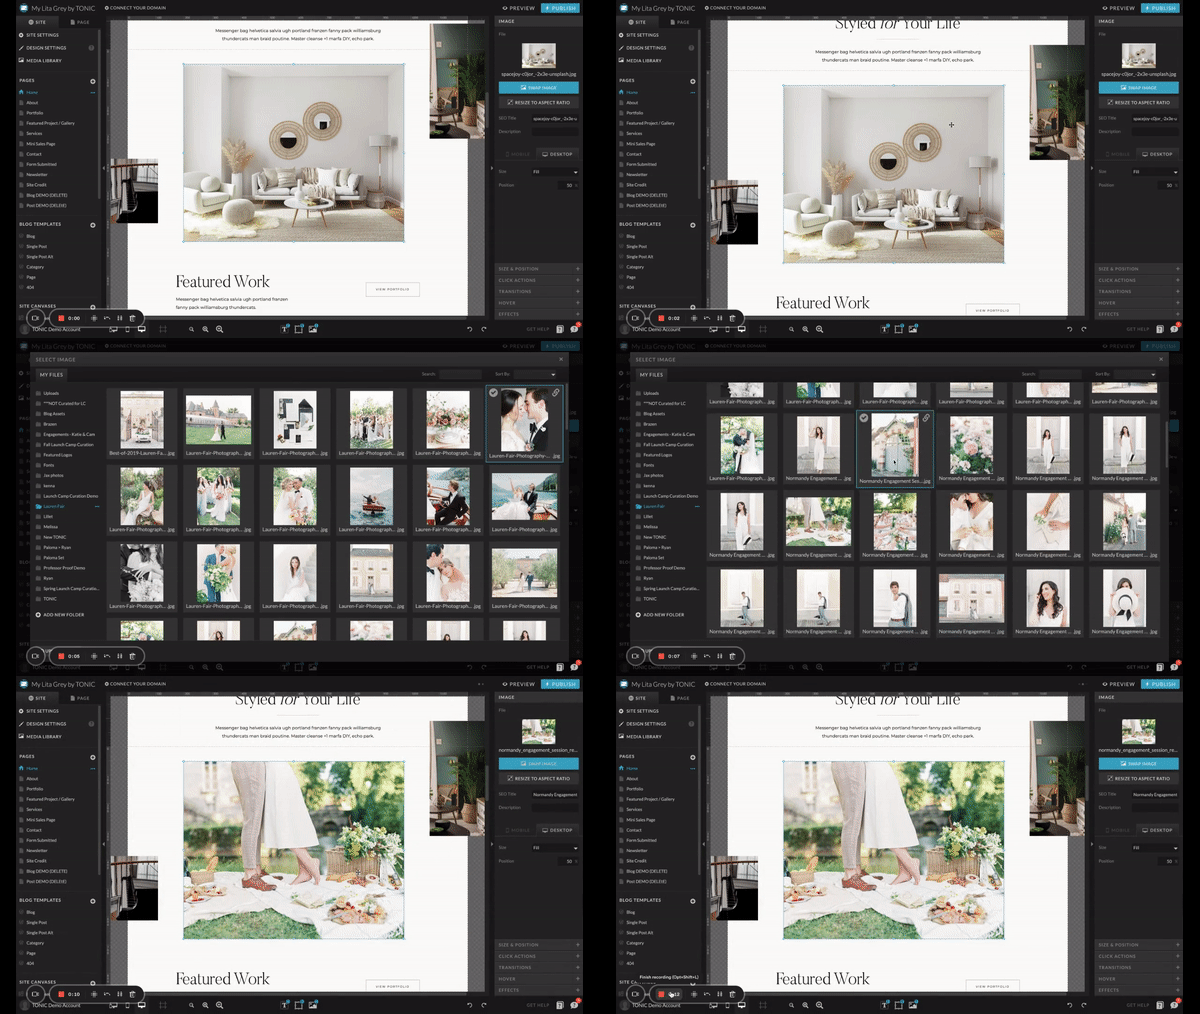
(Or, if you’re replacing a canvas background, select “canvas background” and then click on the image—or video—to replace it.)
We suggest adding the SEO title and description when you add the image, so you don’t have to go back and optimize all of your media for SEO later on. Not sure where to start with SEO, here is your official Showit SEO Checklist.
Pro Tip: Showit has curated incredible resources for how to add images in Showit. And here’s Jeff’s image curation guide.
#4 – Customizing Your Website Design
Now that you’ve added all of the things that make your website yours—branding, fonts, colors, copy, media—you have full freedom to further customize as you please.
If you have questions along the way, feel free to reach out to the (actually-human) Showit support team; they’re on a mission to be deemed the friendliest support team on Earth, and they’d love to help you!
(We’d also love to help you by answering any questions you have about your TONIC template, too – simply send your questions to info@tonicsiteshop.com.
#5 – Optimizing Your Website For SEO
The best websites are the ones your people can actually find. And that’s where search engine optimization comes in: to make you more visible, credible, and click-worthy.
Here are our favorite (easy-to-understand) SEO resources for beginners:
→ What is SEO and why is it important?
→ How to use Showit SEO tools for your website
→ Everything you need to know about Showit SEO
→ Is Showit even good for SEO…?
→ Your Showit SEO questions, answered
→ Moreno Collective’s Showit SEO Course
#6 – Testing EVERYTHING for User Experience
A website full of broken links, typos, and wonky design is a website that gets instantly ditched, sworn off, forgotten about, or all three.
Testing everything is essential in order to create a positive user experience, so readers keep coming back (and search engines keep recommending your website to new people).
Before hitting “publish” on your site, you’ll want to make sure you triple-check your website preview link for these specific potential mistakes:
Copy → Do you have any “lorem ipsums” still hanging out in your paragraphs? Are there any misspelled words? Repeated sentences? Awkward statements that would make your grammar-loving 8th grade teacher frown? (Feel free to post your site in our TONIC regular Facebook group if you want an extra set of eyes to check it out!)
Links → Do all of your links work? Do they lead your users to the appropriate place? Is everything that’s supposed to be a link actually a link? (Ask a friend to check out your site preview to see if all of your links work—then give them 15% off their own TONIC template with your affiliate link, once they see how gorgeous your site is & inevitably want their own!)
You’ll want to set up Click Actions—aka set the intention for the action you want to happen when someone clicks on an image, button, word, etc—to connect links to pages of your site, social media, etc. Most of the TONIC Click Actions are set for you, but here’s a tutorial about how to navigate Click Actions just in case.
Mobile design → Did you remember that you can make your mobile design look completely different than your desktop design? Does yours look exactly like you want it to? (If not, here’s how to make mobile vs. desktop changes.)
Canvas views → Have you adjusted all of your canvas views, or do some of them still have the template text? (If you’re wondering “um, what the…?” – Here’s more info about canvas views & how they work.)
Social media → If you have social icons on your site, do they send your users to the appropriate place? (Here’s how to set up social media links.)
And, remember: proofread, proofread, proofread. We find that you catch the most mistakes when you wait at least a day in between “finalizing” everything and looking it over. It gives your brain a chance to forget your intentions, so you can’t subconsciously fill in what you meant to do or say.
#7 – Launching & Marketing Your New Showit Website
Now that you’ve crossed everything off of your new Showit website launch checklist, it’s time for the best part: LAUNCHING!
…but that’s not all. With launching inevitably comes marketing—so you can ensure your new site gets the celebration it deserves—and marketing takes a little more effort than simply telling Showit “hey, I’m ready to go live!” and telling your audience “that new website I said was coming soon? It’s here!”
You’ll never get more traffic to your website than the day of your new website launch, but that won’t happen if you don’t TELL anyone you’re launching!
Here are a few ways you can get those views:
→ Post on Instagram stories with a countdown
→ Email your list and let them in on the BTS of launching a new site so they’re invested in seeing the final product (ahem, a perfect TONIC affiliate marketing opportunity if you ask us!)
→ Make a before-and-after reel of your old site vs. your new site
→ Write a new blog post and direct people to read it & browse your new site while they’re there
→ Launch a new freebie your audience can only access via your new site (super easy with Showit!)
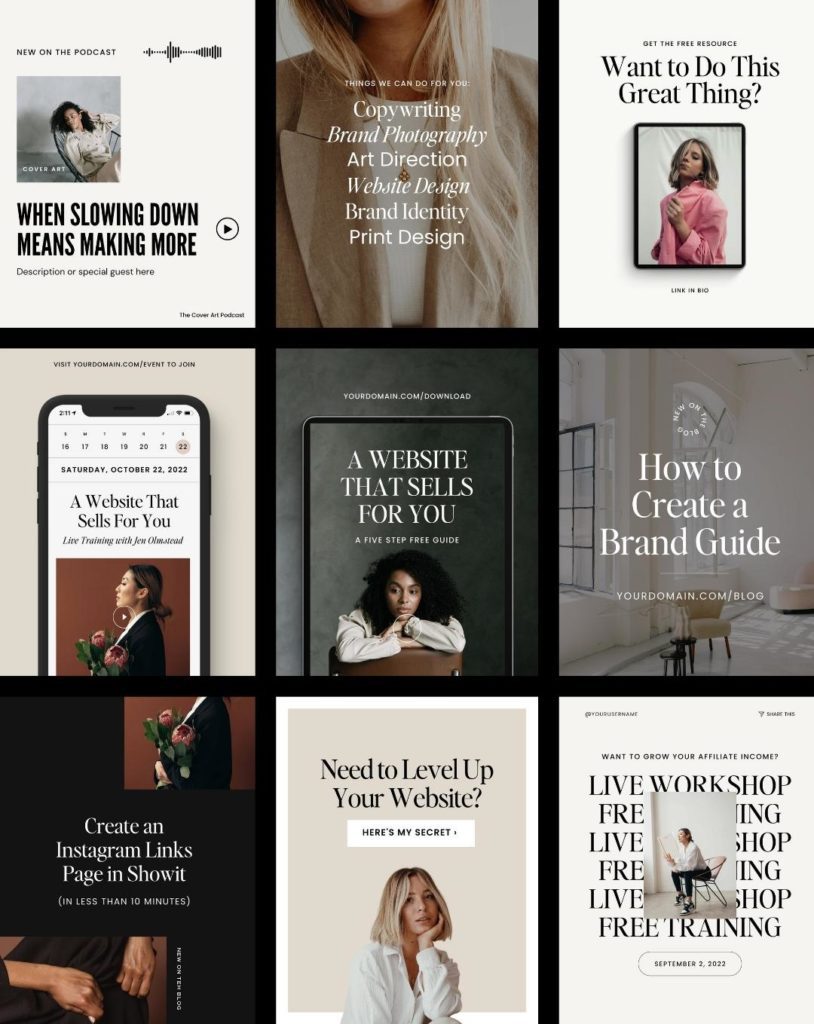
Or, if you want your launch prep to be *really* easy… get the marketing pack edition of our Canva social media templates – all of the content planning has already been done for you! All you’ll have to do is add your own colors and copy, and you’re ready to invite infinite viewers to your new Showit website.
With our social templates, launching your new Showit template can look like this…
(For more ‘new website’ launch announcement samples, check out this walkthrough video of our Marketing social templates!)
Now, it’s time to celebrate your Showit website!
You’ve finally done it – your site is live, you’ve told (and excited!) your people, your content is officially on its way to being indexed by Google & recommended to the right audience. YOU DESERVE TO CELEBRATE!
We think you’ve earned a G&T. Here’s some of our favorite recipes.
Want some extra attention on your new Showit website?
Let us know you’re live! There are few things in this world we love more than seeing new TONIC templates in the wild, so if you’ve used one of our designs to launch your site, we’d love to see how you’ve made your template your own.
Click to join our TONIC regulars Facebook group so you can show off your site!
If you liked this post and want to be notified when the next one goes live, make sure you’re following along with us on Instagram & subscribed to our #longandweird newsletter for updates!

