Summary
In this post, we’re going to show you how to add a Flodesk opt-in form to your Showit template, how to style the form to match your website, and how to deliver your freebie and newsletter automatically with Flodesk workflows!
Do you have a newsletter you want to send to subscribers? How about a freebie you’d love to offer on your website?
Collecting email addresses are key to a successful business. That’s why each TONIC Showit template comes with a freebie and newsletter page. These pages are powerful and can be used in many different ways.
In this post, we’re going to show you how to add an opt-in form to collect emails, how to style the form to match your website, and how to deliver your freebie and newsletter automatically! Time to play with the big dogs, friends!

Here’s what we’ll cover
- What’s the best email marketing platform for Showit users?
- How to create an opt-in form for your Showit template
- How to style your opt-in form to match your Showit template
- How to add an opt-in form to your Showit template
- How to automatically deliver your freebie/newsletter
What’s the Best Email Marketing Platform for Showit Users?
There are tons of email marketing platforms out there, but our favorite is Flodesk because it’s pretty, intuitive and created by two female entrepreneurs. Yes please!
Flodesk makes creating stunning opt-in forms, managing your subscribers, and sending emails and downloads a breeze.
Most email marketing platforms *cough* mailchimp *cough* have tons of features you’ll never use, a complicated interface making it impossible to get work done, and charge you more money as your list grows. Eww, gross!
Flodesk costs $38 per month, no matter how big your list grows!
Ready to get started? Sign up today and get 30 days free!
How to Create an Opt-in Form for Your Showit Template
Flodesk has 3 different opt-in form types. Pop-up, Inline, and Full Page.
Pop-up: These opt-in forms pop up when a user lands on your website. Once someone opts-in or clicks the close button, it disappears and won’t show to that user again.
Inline: These opt-in forms are embedded onto your website. They will always be visible wherever you embed it. This is the type of form we’ll use for our Newsletter and Freebie pages.
Full Page: This option allows you to create an opt-in form on a custom flodesk link. It won’t be embedded or pop-up on your site.
What type of Flodesk form is best for Showit?
When adding an opt-in form to your newsletter or freebie page, you’ll want to use an inline form.
Ribbon banner I and Inline without image I are our go-to favorites. That’s because adding images and text around your form is much easier inside of Showit, rather than in Flodesk.
Once you have your inline form selected, you’ll be prompted to choose a segment.
What are Flodesk segments?
A segment is basically a group of subscribers, organized by what they signed up for. Typically, you’ll start out with a “newsletter” segment for general subscribers who want to receive your newsletter updates. If you have a freebie, it’s good to segment your subscribers by which freebie they downloaded.
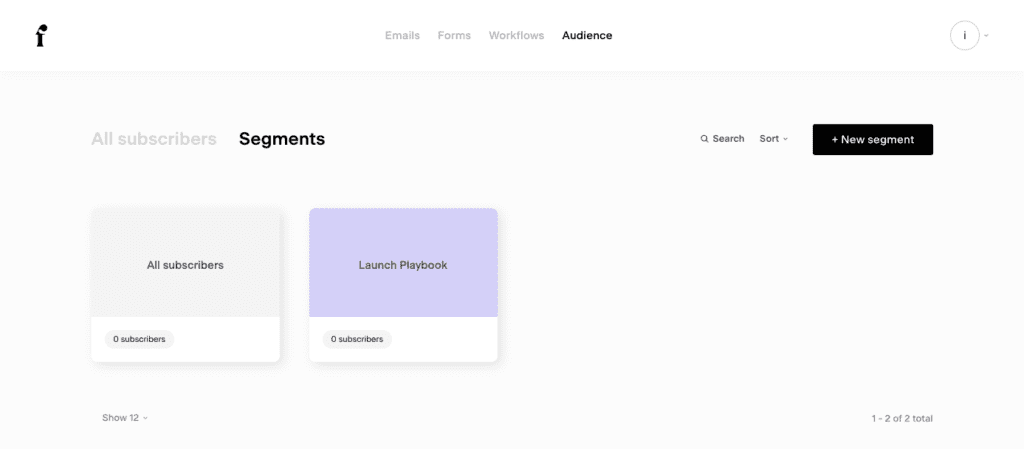
Flodesk will automatically create an “All Subscribers” segment that combines every subscriber so you don’t have to worry about creating that yourself.
Segmenting (organizing) your subscribers is really important. If you want to email your subscribers who signed up for a waitlist for a new service you’re offering, you don’t want everyone on your list to receive that email, just the ones who opted into that waitlist.
You can have as many segments as you’d like and each form needs to send subscribers to at least one segment.
Style Your Form to Match Your Showit Template
Flodesk makes it so easy to style your form which is like the best news ever, right?. Here are some styling tips to keep in mind…
Remove the background color
Removing the background (making it transparent) will allow the background color of your Showit template to come through. Simply click on the form background and select the circle with a red slash through it to remove the background color of your form.
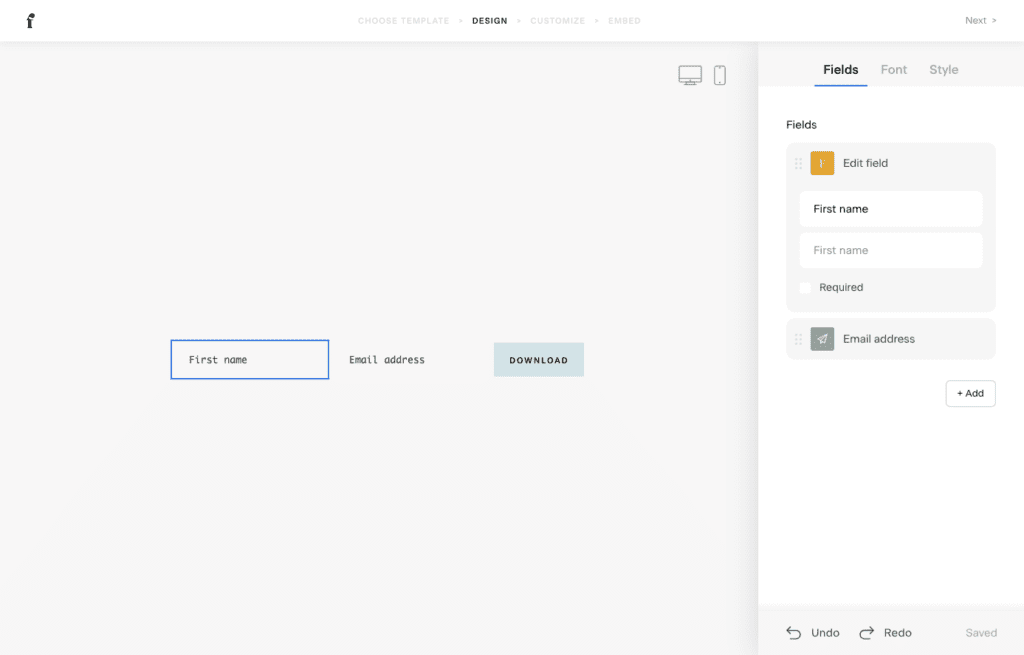
Customize form field
When writing emails, you’ll want to add personal touches, like names, to your copy. To add form fields, select a field and click on “+ Add” button on the right.
Remove any text above the form
Removing the heading and body text above the inline form will allow you to embed just the form itself. Your newsletter and freebie pages already have these text boxes in Showit so removing them from the flodesk form itself is recommended.
Simply double click over the heading and body text, highlight all of the text, and delete.
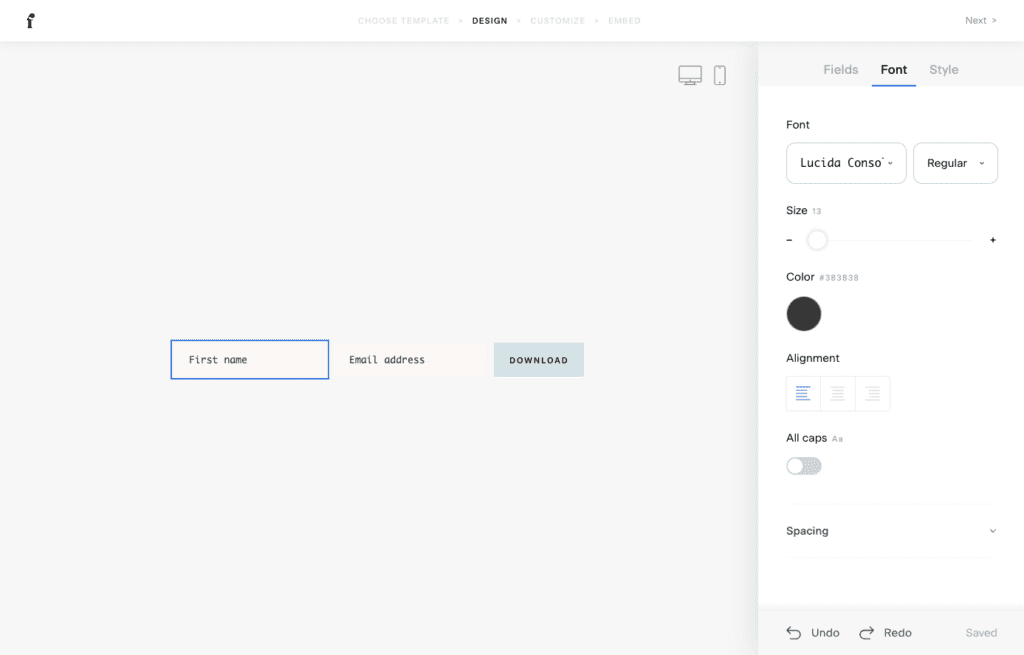
Customize your Flodesk form fonts
Flodesk has over 100 fonts available for you to choose from. We’d also like to add that the font’s available are BEAUTIFUL! You may not find the exact font used on your template, but we bet you can find one that’s very similar.
Select the “email address” field then select the “Font” tab on the right hand side. All of your font styles will be available here. Do the same for the “Subscribe” button.
Update the subscribe button text
If you want your opt-in form to stand out don’t forget to update the subscribe button text! Simply double click the “Subscribe” text inside of the button to update.
How to Add an Opt-in Form to Your Showit Template

Once you’re done designing your Flodesk opt-in form, it’s time to embed it onto your website!
Before Flodesk gives you any code, they’re going to ask you some questions.
Should we enable double opt-in?
If yes is selected, your subscribers will receive an email asking them to confirm that they opted-in. Learn more about double opt-in here.
When subscribers opt in to this form
If notifications are set, Flodesk will email you every time someone subscribes.
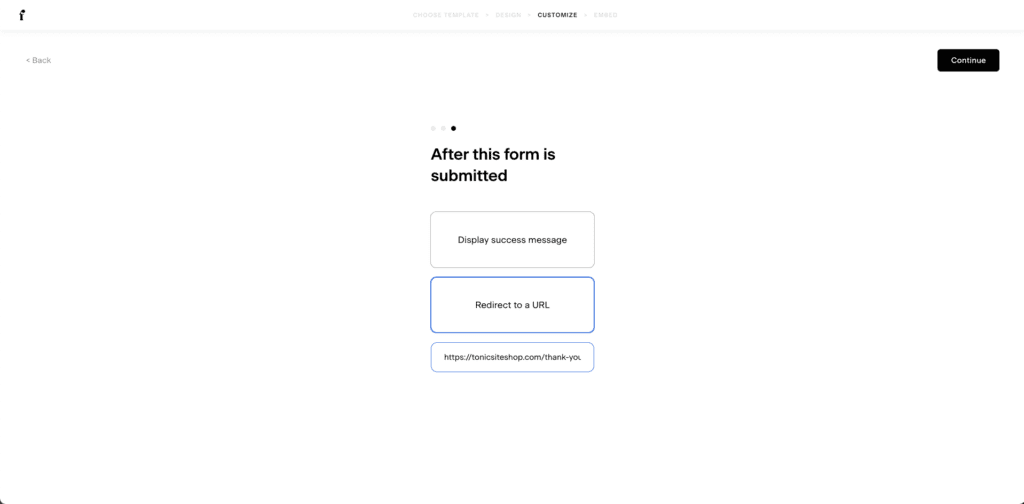
After this form is submitted
There are two options to choose from. Displaying a success message and redirecting to a URL. Each TONIC template comes with a “Form Submitted” page that you can use for this.
Redirecting is also a great option when you want to send a subscriber to a download page instead of sending the download in an email.
Publish and embed your form
Now that we’ve customized the form settings, we can grab the Flodesk opt-in form code and add it to our Showit template.
For inline forms, Flodesk will provide “Header code” and “Inline code”. You’ll need both code snippets to display your opt-in form.
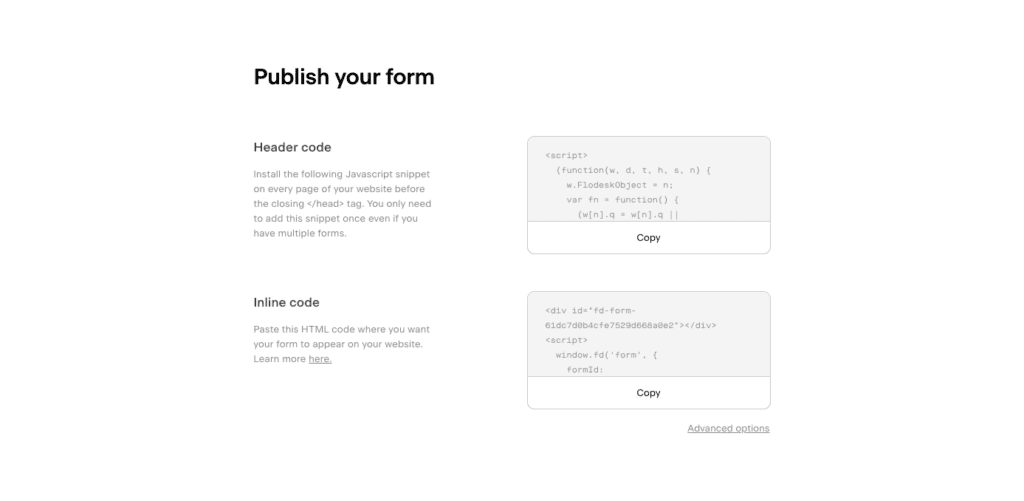
First, copy the “Header code” and head over to Showit. Add an “embed code” box to your newsletter or freebie page and resize the embed code box (it doesn’t have to be perfect, we’ll adjust it later)
Double click inside of the embed code box and paste your “Header code”.
Head back to Flodesk and copy the “Inline code”. Next, paste the “Inline code” under the “Header code” in the same embed code box.
Click “Save” and you should see your Flodesk opt-in form!
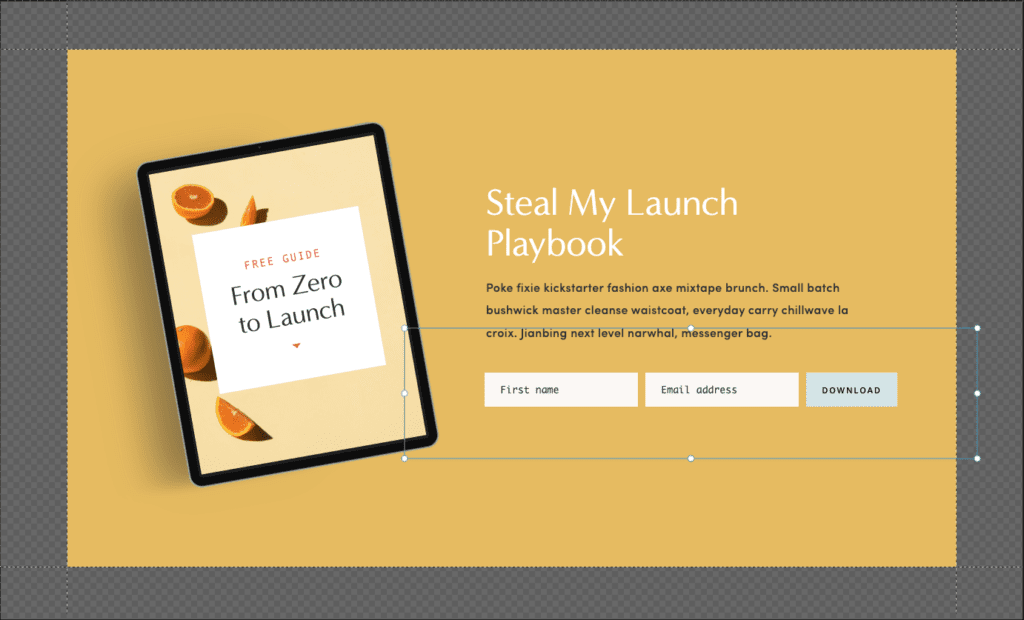
Form size and position
Once you see your form in the embed code box you can stretch the box wider to fit the form. If your embed code box is not wide enough, your form may stack and look a bit off.
Before publishing your site, it’s important to preview it. Click on preview and check how the form looks on desktop and mobile. Adjust if needed.
How to Automatically Send an Email in Flodesk
When someone subscribes to your newsletter or opts-in to your freebie, you’ll probably want to automatically send them an email, deliver the freebie, or send them to a download page.
All of these options are easy to do with Flodesk. Let’s take a look at how it’s done.
What are Flodesk workflows?
Once you create your form, the next step is to create a Flodesk workflow.
Flodesk workflows allow you to automatically send an email to your subscriber once they opt-in. These emails can be welcome emails, contain download buttons, and more.
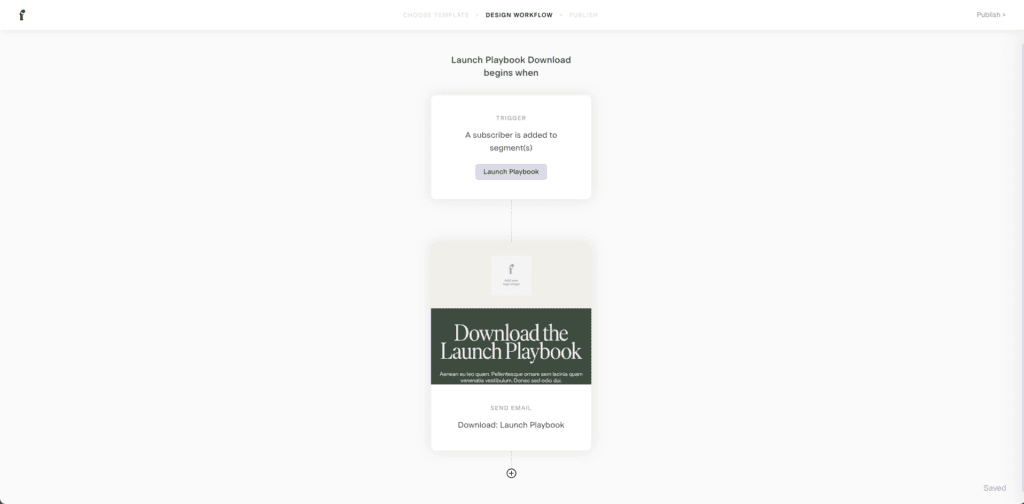
How do you create a Flodesk workflow?
Select “Workflows” in the top navigation then click “+ New workflow”.
Flodesk has a ton of great sequences (a.k.a. Pre-designed workflow structures) but we typically start from scratch (especially if it’s a simple one email sequence).
Once you select “start from scratch” or select the pre-designed sequence to start with you’ll want to name your workflow.
Next, click on “+ Add trigger”. Your first trigger will tell Flodesk when to activate this workflow. As of now, there is only one option. Select “A subscriber is added to segment(s)” then choose your segment.
If you’re delivering a freebie download, like a PDF, then select the segment you created when creating the opt-in form for your freebie page.
Next, click on the “+” symbol and select “Email”. If you’d like to delay the email, select “Time delay” then repeat this step and select “Email”.
Now it’s time for the fun part! You’ll need to create a new email that gets sent to your subscriber when they opt-in.
Select “Create new email” and choose from the 30+ pre-designed email templates or start from scratch if you have that creative itch and know exactly what you want!
We won’t go into details about all the features of designing an email in Flodesk, but you can read all about it here!
Send subscribers to a success page
Sending subscribers to a “success” page can be a great option if you’re delivering a freebie download or want to thank the subscriber for opting-in.
You do have to be careful with this option as you don’t always want to force the subscriber to leave the page they are on.
Before you redirect the subscriber, you’ll want to create a page in Showit to redirect them to. We usually duplicate the “Form Submitted” page and add our content there.
Next, click on “Forms” in Flodesk and select “Edit” on the form you’d like to enable opt-in redirects on. Then click on “Customize” in the top navigation bar.
Click “Continue” until you see the “After this form is submitted” question and select Redirect to a URL.
Paste your URL and click “Continue”.
Your form will automatically save. If you’ve already added the form code to Showit, there is no need to re-add the code. It will automatically update on your website!
Sign up for Flodesk
Creating opt-in forms, adding them to your Showit website, and automatically sending emails to subscribers is incredibly easy when using Flodesk and Showit. If you’re ready to start building your subscriber list, then Flodesk is the perfect place to start!
Use our top-shelf Flodesk discount link to save 50% off your Flodesk subscription!